Installation Instructions
It's easy to install make sure you meet all the requirements and follow these nine steps carefully without doing anything wrong - done!
Preparations
- Check that the requirements are met.
Installation
1 - Add addon-lime-automation to the customer solution and install
The customer solution must be poetry based - have a look in the platform docs on how to handle solutions and adding dependencies to addon-lime-automation.
Before you proceed
- Is the addon installed on the server? (Run pip show addon-lime-automation from Lime CRM command prompt. It should show package details if installed on the server).
2 - Setup tables and fields
Now it's time to set up the required tables and fields required for lime-automation.
You can do this by running the addon-installer in Lime Admin under Automated Flows -> Setup or manually by following this spec. Remember to select at least one table to relate to Automated Flow Participants.
The tables and fields are not required to have to the same naming as in our docs but the relation between the tables must be the same. The table and field names are then configured in Lime admin if they differ from the default.
If you have made any changes to the default tables and field setup be prepared to configure the changes in lime admin later.
Info
If the customer will be using the desktop client don't forget to add all descriptives, optionqueries and icons to the corresponding tables in LISA. You can find them in the LIP file available on the latest GitHub release for addon-lime-automation
Before you proceed
- Are all required tables and fields set up?
- If the customer is using the desktop client, have you added the icons to the tables?
3 - Configuration in Lime admin
When addon-lime-automation is installed and the database meets the requirements it's time to configure addon-lime-automation in lime admin.
Open Lime Admin -> Settings -> Automated Flows from the web client. The config will have prefilled values but it needs to be saved.
Things you may need to change/add
-
Tables and fields if they don't follow the default setup.
-
Autofill properties. Add/remove the fields on the participant which triggers automatic mapping of the participant property values.
Details on how to configure in Lime admin can be found here.
Before you proceed
- Can you save the config?
- Have you double checked the parts that aren't validated?
4 - Permissions
When setting up the integration a API key in Lime CRM will be used. Make sure that the user for that API key has the correct permissions in the database.
The account will need read/write/add permissions to all tables used by the integration. If you make any changes on the tables names etc. you need to set the permissions for those tables.
If you use autofill properties the user also needs read access to all those tables configured in the autofill properties but also all objects that may be configured for a lime_field on the automated flow property.
Info
The addon installer will add the required user and group for you. You can skip step 1 and 2 below if you installed the package with the addon installer.
- Create an integration group
automation-integration - Create a dedicated API user
[email protected]and add to theautomation-integrationgroup - Create an API key for the user and save for later use
- Create table policies for
tbl_automatedflow,tbl_automatedflowparticipant,tbl_automatedflowproperty,tbl_automatedflowparticipantpropertyandtbl_automatedflowparticipantaction(Add policiestbl_linkclickandtbl_emailopeningif you chose to install the optional tables). - Assign the policies to the corresponding tables and assign the
[email protected]user correct permission for the policies.
| Policy name | R | W | A | D | Apply to |
|---|---|---|---|---|---|
| tbl_automatedflow | • | • | • | automated flow table | |
| tbl_automatedflowparticipant | • | • | • | automated flow participant table | |
| tbl_automatedflowparticipantproperty | • | • | • | automated flow participant property table | |
| tbl_automatedflowparticipantaction | • | • | • | automated flow participant action table | |
| tbl_automatedflowproperty | • | • | • | automated flow property table | |
| tbl_emailopening | • | • | • | email opening table if the table is used | |
| tbl_linkclick | • | • | • | link click table if the table is used | |
| tbl_xyz | • | xyz table if relation to xyz exists for automated flow participant |
5 - Create a Lime Marketing API key
Log in to customer Lime Marketing app as an administrator. Go to Administration -> Integrations -> API keys and create a new API key of type user. Attach that API key to an admin user in Lime Marketing. You can set up an integration admin user who cannot log in via the UI only be used in the integration and use that user for the API key.
6 - Configuration in application_config.yaml/CAFE
Open the Application config for on-prem customers @ %ProgramData%\Lundalogik\LIME Pro Server\application_config.yaml or go to the CAFE config for cloud customers
Modify the config file to include the following section without breaking the format of the file if there are other configuration in that file.
application_name:
    config:
        addon_lime_automation:
            apiurl: https://app.bwz.se/bedrock/<customer_name>/api
    secrets:
        addon_lime_automation:
            apikey: *guid_api_key_created_in_lime_marketing*
Details on how to do this can be found here.
If you are installing the addon for an on-prem customer its recommended that you convert existing ini config to the yaml format. More info om the config here.
Before you proceed
- Can you start the event handler without it throwing any errors?
- Double check the API key and url.
7 - Add the integration in Lime Marketing
If the customer already has a lime-newsletter or addon-lime-event integration you don't have to add a new Lime CRM integration as described here. Go to the next step.
Log in to customer Lime Marketing app as an administrator. Go to Administration -> Integrations -> Add new Lime CRM integration.
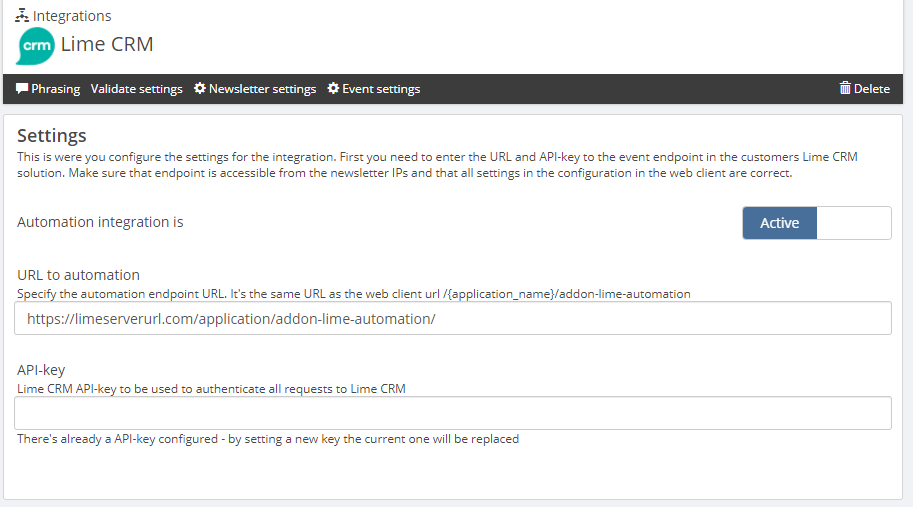
8 - Configure the automation integration
Log in to customer Lime Marketing app as an administrator. Go to Administration -> Integrations -> Lime CRM -> Automated flows.
Enter the endpoint url to addon-lime-automation. Which is application webclient base URL + /addon-lime-automation.
The base URL is the webclient url/application name. It's the same URL as you find in the API docs up until /api.
Enter the API-key for the integration to use. (Can be the same key as used in lime-newsletter or addon-lime-event)
Click validate settings and check for error messages.
It's really important that you get the URL and API key correct - we wont be able to give you any hints until its correct.
Before you proceed
- Do you have any error messages?
- Have you activated the integration? Both the automation part and Lime CRM integration should be set as active.
9 - Verify
Done! - Try it out to be sure it works.
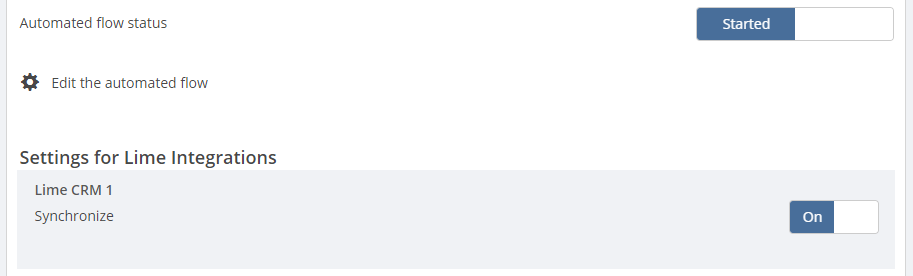
- Create an Automated flow in Lime Marketing.
- Edit the flow content and add an email step and enter some test content and sender information - save and close.
- Switch synchronize with Lime CRM switch to on.
- Start the flow by switching the automated flow status switch to started.
- Open Lime CRM and go to the automated flows tab - the automated flow should have appeared in there.
- If you use autofill properties:
- Configure the lime_field value for the automated flow properties for the automated flow so that data is fetched from the correct lime type (i.e. person.email etc).
- You should get an error in the error message if you have entered an incorrect value.
- Add a participant to the automated flow.
- If you use autofillproperties connect a person to the particpant and save otherwise add the properties with values manually.
- Then the properties should automagically appear with the correct values.
- Check the Execute flow for participant checkbox and save.
- The participant should get its status set to in progress by the integration.
- Check the actions tab for the participant and make sure that the email action has been reported.
- The participant should have its status set to finished when done.
- Celebrate!